Menu-QML-Type
Menu-QML-Type
Menu popup that can be used as a context menu or popup menu.
待办:
Context Menus
for example, a menu that is shown after right clicking
在鼠标右键的位置弹出菜单
import QtQuick
import QtQuick.Controls

ApplicationWindow {
    visible: true
    width: 640
    height: 480
    title: qsTr("Hello Menu")

    MouseArea {
        anchors.fill: parent
        acceptedButtons: Qt.LeftButton | Qt.RightButton
        onClicked: function(mouse) {
            if (mouse.button === Qt.RightButton)
                contextMenu.popup()
        }
        onPressAndHold: function(mouse) {
            if (mouse.source === Qt.MouseEventNotSynthesized)
                contextMenu.popup()
        }

        Menu {
            id: contextMenu
            MenuItem { text: "Cut" }
            MenuItem { text: "Copy" }
            MenuItem { text: "Paste" }
        }
    }

}- 设置响应的鼠标按键:默认为Left,通过 | 设置响应多个鼠标按键
- 创建Menu
Menu 由 MenuItem 组成,MenuItem可设置显示的文本 - 鼠标右键点击:onClicked
- 获取鼠标位置:MouseEvent 中包含鼠标的位置
- 弹出Menu:popup()
- explicitly specified: 显式指定位置,在该位置显式Menu
- mouse cursor avaliable:is positioned at the mouse cursor
- otherwise: centered over its parent item.
这里没有指定位置,鼠标可用,所以在鼠标位置弹出
mouse.source:产生鼠标事件的来源;MouseEventNotSynthesized:不是合成的-真实鼠标点击产生
注意:原文中鼠标的事件(信号)响应中没有声明函数的参数,会产生以下错误。
Parameter "mouse" is not declared. Injection of parameters into signal handlers is deprecated. Use JavaScript functions with formal parameters instead.错误信息的含义:没有声明mouse。反对注入参数到signal handlers。使用标准的js function(para)替换
效果:
Popup Menu
for example, a menu that is shown after clicking a button
点击按钮后在按钮的下方弹出Menu
import QtQuick
import QtQuick.Controls

ApplicationWindow {
    visible: true
    width: 640
    height: 480
    title: qsTr("Hello Menu")

    Button {
        id: fileButton
        text: "File"
        onClicked: menu.open()

        Menu {
            id: menu
            y: fileButton.height

            MenuItem {
                text: "New..."
            }
            MenuItem {
                text: "Open..."
            }
            MenuItem {
                text: "Save"
            }
        }
    }
}- 按钮点击:onClicked
- 弹出菜单:menu.open()
- 设置菜单位置:y: fileButton.height
菜单的位置通过x、y进行设置。x、y是相对于parent而言,初始位置 (0,0)在parent的左上角。这里设置y为button的高度,所以菜单贴着button的下边缘显示
效果:
closePolicy
菜单的关闭策略
继承于Popup
默认值是 Popup.CloseOnEscape | Popup.CloseOnPressOutside. Menu(Popup)获取到焦点时按下ESC,或者点击Menu 外面区域
sub-menus and Action
可以创建子菜单,以及使用Action 代替 MenuItem 作为菜单项
实现
        Menu {
            id: menu
            y: fileButton.height
            Action { text: "Cut" }
            Action { text: "Copy" }
            Action { text: "Paste" }
            MenuSeparator {}
            Menu {
                title: "Find/Replace"
                Action { text: "Find Next" }
                Action { text: "Find Previous" }
                Action { text: "Replace" }
            }
}- 使用Action:Action
- 分隔线:MenuSeparator
- sub-menu:子菜单本身需要作为父菜单的一项显示,鼠标移动到它时弹出它所包含的菜单项。
- 是否展开子菜单由父带单的cascade属性决定
如果设置为false,那么点击sub-menu 项后子菜单centered over the parent menu
效果: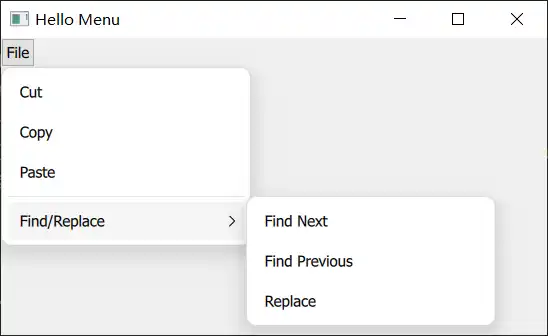
Margins
边距的含义:菜单栏的边缘 和 它所在窗口 边缘的距离
Menu 中margins 的默认值是0:它被限制只能显示在窗体内部,不能超出窗体。
不能超出的含义:
将弹出Menu的Button放置在窗体外,然后看Menu 的位置
        width: 100
        x: -50
效果:
可以看到原本Menu 应该是在Button 下方(Menu 的x 为0),这样一部分文本应该是不显示的,但是由于margins 的限制,Menu 只能显示在窗体内。
To allow the menu to go outside of the window (to animate it moving into view, for example), set the margin property to -1.
但是,啊但是。实际设置Menu的margin 为 -1,还是没有显示在外面。
效果:
只不过是Menu 的长度缩短了。。。
其他
- 可以使用add、insert、move 等动态修改menu items。
- 可以使用itemAt、contentChildren 访问 items
- Menu can contain any type of item
Dynamically Generating Menu Items
Using Instantiator
动态生成items 的一个示例:
在Menu 中显示最近打开的文件列表,具备以下功能:
- 列表为空时,最近打开文件Menu 不可用
- 可以清除最近打开文件
- 点击文件列表中的一项时打开该文件
- 打开文件后当前文件添加到文件列表中
instantiator: Dynamically creates objects.
ListModel 中存储最近打开文件信息:文件路径(含名称)
instantiator 根据 model 生成 items 添加到Menu 中
用一个按钮模拟添加文件,点击按钮后文件列表中新增一项
实现:
import QtQuick
import QtQuick.Controls

ApplicationWindow {
    visible: true
    width: 640
    height: 480
    title: qsTr("Hello Menu")

    ListModel {
        id: settings
        ListElement { filePath: "D:/Projects/Quick" }
        ListElement { filePath: "D:/Projects/Cpp" }
    }

    Button {
        id: fileButton
        text: "File"
        width: 100
        onClicked: menu.open()
        Menu {
            id: menu
            title: qsTr("File")
            Menu {
                id: recentFilesMenu
                title: qsTr("Recent Files")
                enabled: recentFilesInstantiator.count > 0

                Instantiator {
                    id: recentFilesInstantiator
                    model: settings
                    delegate: MenuItem {
                        text: filePath
                        onTriggered: {
                            console.debug(`loadFile(${text})`)
                        }
                    }
					onObjectAdded: (index, object) => recentFilesMenu.insertItem(index, object)
                    onObjectRemoved: (index, object) => recentFilesMenu.removeItem(object)

                }

                MenuSeparator {}

                MenuItem {
                    text: qsTr("Clear Recent Files")
                    onTriggered: settings.clear()
                }
            }
        }
    }

    Button {
        text: "add"
        anchors.centerIn: parent
        property int i
        onClicked: {
            i++
            settings.append({ filePath: ("D:/Doc" + i) })
        }
    }

}- Items 的生成:由Instantiator绑定 model后创建
- 添加items:Instantiator 只动态生成对象(items),还要在onObjectAdded中将item 添加到Menu 中进行使用。
- clear:点击MenuItem 后触发triggered信号
- add:创建jsObject 后添加到model中
- enabled状态:可以根据instantiator 也可以是Menu 自身 的item 数量进行判断
效果:
初始状态:
点击add 按钮后: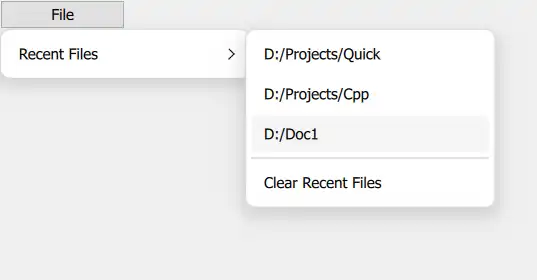
点击Clear Recent Files 后:
再次点击add 按钮:
Using Dynamic Object Creation
You can also dynamically load a component from a QML file using Qt.CreateComponent(). Once the component is ready, you can call its createObject() method to create an instance of that component.
添加的对象被封装到component中
实现:
 Row {
     anchors.centerIn: parent

     Component {
         id: menuItemComponent

         MenuItem {}
     }

     Button {
         id: button
         text: "Menu"
         onClicked: menu.open()
         Menu {
             id: menu
         }
     }

     Button {
         text: "Add item"
         onClicked: {
             onClicked: {
                 let menuItem = menuItemComponent.createObject(
                     menu.contentItem, { text: qsTr("New item") })
                 menu.addItem(menuItem)
             }
         }
     }
 }
这里加载的Component 只是一个MenuItem。点击add 按钮后先创建Component对象,然后添加到Menu中。
创建object:指定Component的parent,然后设置component 的属性
效果:
初始:
点击add后:
Menu Types
A menu offers three different implementations
You can choose which one should be preferred by setting popupType
| Type | 外观 | 渲染方式 | 影响 |
|---|---|---|---|
| Item | 所有平台一致 | be embedded into the same scene as the parent 和parent 在同一scene内 | 可能会被scene内其他控件覆盖(即无法显示在顶层) |
| Window | separate window QQuickWindow内渲染 | 不会被遮挡 | |
| Native | 由所使用的平台决定 |
使用Item:
截取的是整个ApplicationWindow,说明Menu 位于 parent -ApplicationWindow 的scene 内
使用Window:
使用snipaste 截图时按照窗口截取,这里截出来的范围比Menu 大了一圈,说明Menu位于一个Window内
显示的样式和Item 一样
使用Native的效果:
Windows 风格
关于遮挡的问题
Menu使用Item 类型。创建一个Rectangle,设置其 z值 为1000,仍然可以显示Menu
    Rectangle {
        z: 1000
        height: parent.height / 2
        width: parent.width
        color: "black"
    }
效果: